HOW TO CONFIGURE AWS SNS
AWS SNS is part of Amazon CloudWatch, and it uses CloudWatch to send email. First, create and subscribe to an SNS topic. When you create a CloudWatch alarm, you can add this SNS topic to send an email notification when the alarm changes state
What is Amazon SNS?
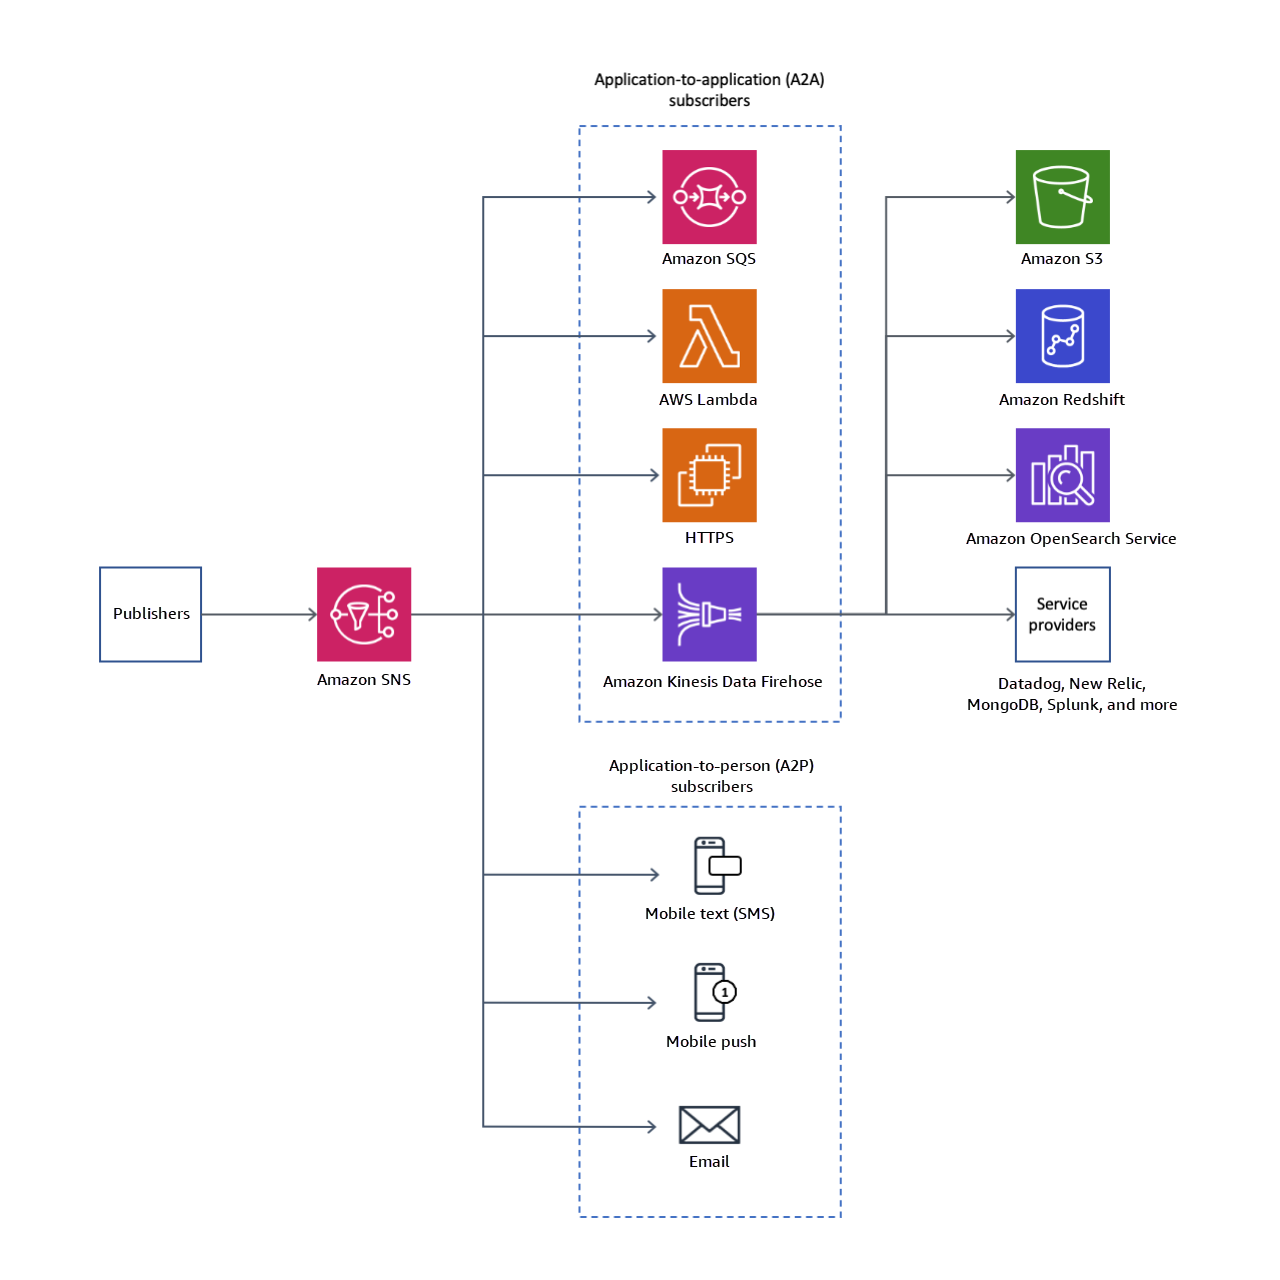
Basically, Amazon Simple Notification Service (Amazon SNS) is a managed service that provides message delivery from publishers to subscribers (also known as producers and consumers). Thus, publishers communicate asynchronously with subscribers by sending messages to a topic, which is a logical access point and communication channel. In other words, Clients can subscribe to the SNS topic and receive published messages using a supported endpoint type, such as Amazon Kinesis Data Firehose, Amazon SQS, AWS Lambda, HTTP, email, mobile push notifications, and mobile text messages (SMS).
Setting up an AWS SNS topic using the AWS Management Console
First, create a topic, then subscribe to it. Hence, you can optionally publish a test message to the topic.
To create a AWS SNS topic
- Open the Amazon SNS console at https://console.aws.amazon.com/sns/v3/home.
- On the Amazon SNS dashboard, under Common actions, choose Create Topic.
- In the Create new topic dialog box, for Topic name, enter a name for the topic (for example,
my-topic). - Choose Create topic.
- Copy the Topic ARN for the next task (for example, arn:aws:sns:us-east-1:111122223333:my-topic).
To subscribe to a AWS SNS topic
- Open the Amazon SNS console at https://console.aws.amazon.com/sns/v3/home.
- In the navigation pane, choose Subscriptions, Create subscription.
- In the Create subscription dialog box, for Topic ARN, paste the topic ARN that you created in the previous task.
- For Protocol, choose Email.
- For Endpoint, enter an email address that you can use to receive the notification, and then choose Create subscription.
- From your email application, open the message from AWS Notifications and confirm your subscription. Your web browser displays a confirmation response from Amazon SNS.
To publish a test message to an SNS topic
Furthermore, with cloud computing, you don’t need to make large upfront investments in hardware. So, you don’t spend a lot of time on the heavy lifting of managing that hardware. Thus, instead, you can provision exactly the right type and size of computing resources you need to power. You can access as many resources as you need, almost instantly, and only pay for what you use.
- Open the Amazon SNS console at https://console.aws.amazon.com/sns/v3/home.
- In the navigation pane, choose Topics.
- On the Topics page, select a topic and choose Publish to topic.
- In the Publish a message page, for Subject, enter a subject line for your message, and for Message, enter a brief message.
- Choose Publish Message.
- Check your email to confirm that you received the message.
Setting up an SNS topic using the AWS CLI
First, you create an SNS topic, and then you publish a message directly to the topic to test that you have properly configured it.
To set up an SNS topic
Create the topic using the create-topic command as follows. aws sns create-topic --name my-topic
Amazon SNS returns a topic ARN with the following format:{ "TopicArn": "arn:aws:sns:us-east-1:111122223333:my-topic" }
Subscribe your email address to the topic using the subscribe command. If the subscription request succeeds, you receive a confirmation email message. aws sns subscribe --topic-arn arn:aws:sns:us-east-1:111122223333:my-topic --protocol email --notification-endpoint my-email-address
Amazon SNS returns the following:{ "SubscriptionArn": "pending confirmation" }
From your email application, open the message from AWS Notifications and confirm your subscription. Your web browser displays a confirmation response from Amazon Simple Notification Service.
Check the subscription using the list-subscriptions-by-topic command.
aws sns list-subscriptions-by-topic –topic-arn arn:aws:sns:us-east-1:111122223333:my-topicAmazon SNS returns the following:
{
“Subscriptions”: [
{
“Owner”: “111122223333”,
“Endpoint”: “me@mycompany.com”,
“Protocol”: “email”,
“TopicArn”: “arn:aws:sns:us-east-1:111122223333:my-topic”,
“SubscriptionArn”: “arn:aws:sns:us-east-1:111122223333:my-topic:64886986-bf10-48fb-a2f1-dab033aa67a3”
}
]
}
Check your email to confirm that you received the message.
AWS SNS

Common Amazon SNS Scenario
Application integration
The Fanout scenario is when a message published to an SNS topic is replicated and pushed to multiple endpoints, such as Kinesis Data Firehose delivery streams, Amazon SQS queues, HTTP(S) endpoints, and Lambda functions. This allows for parallel asynchronous processing.
For example, you can develop an application that publishes a message to an SNS topic whenever an order is placed for a product. Then, SQS queues that are subscribed to the SNS topic receive identical notifications for the new order. An Amazon Elastic Compute Cloud (Amazon EC2) server instance attached to one of the SQS queues can handle the processing or fulfillment of the order. And you can attach another Amazon EC2 server instance to a data warehouse for analysis of all orders received.
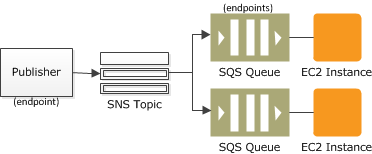
You can also use fanout to replicate data sent to your production environment with your test environment. Expanding upon the previous example, you can subscribe another SQS queue to the same SNS topic for new incoming orders. Then, by attaching this new SQS queue to your test environment, you can continue to improve and test your application using data received from your production environment.