
How Does An AWS Network Load Balancer Work?
Introduction – How does an AWS Network Load Balancer work? – Step by Step Tutorial
Elastic Load Balancing automatically distributes your incoming traffic across multiple targets. Such as EC2 instances, containers, and IP addresses, in one or more Availability Zones. It monitors the health of its registered targets, and routes traffic only to the healthy targets. Elastic Load Balancing scales your load balancer as your incoming traffic changes over time. Above all, it can automatically scale to the vast majority of workloads.
Basically, Elastic Load Balancing supports the following load balancers: Application Load Balancers, Network Load Balancers, Gateway Load Balancers, and Classic Load Balancers. You can select the type of load balancer that best suits your needs. This article discusses Network Load Balancers.
AWS Network Load Balancer components
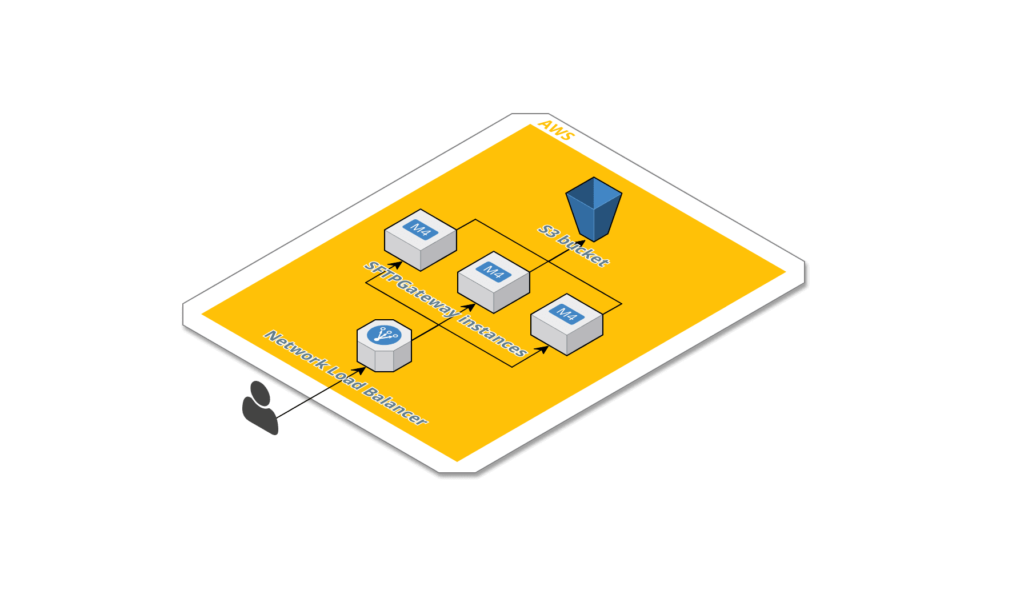
1. A load balancer serves as the single point of contact for clients.
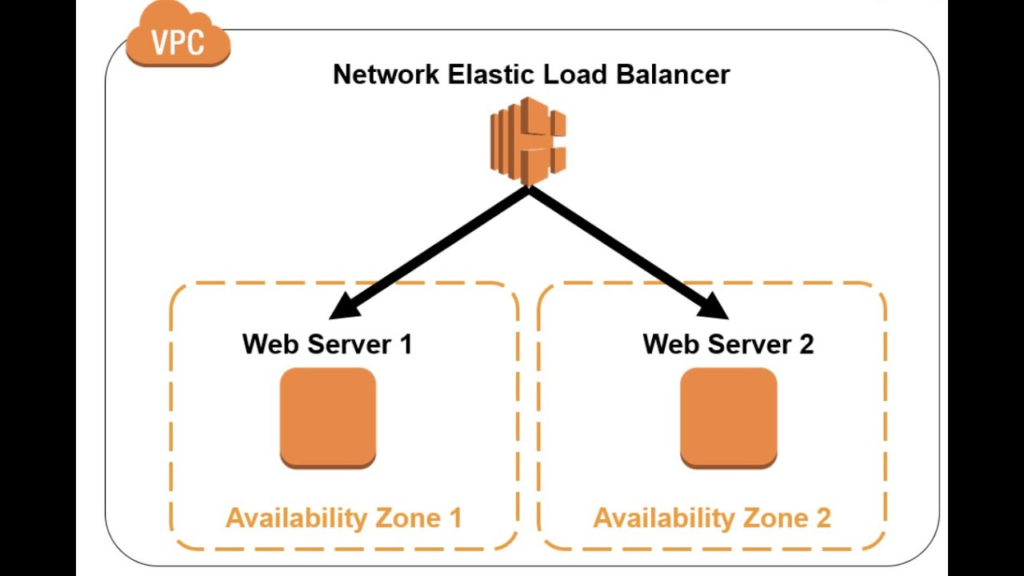
Basically, a load balancer serves as the single point of contact for clients. The load balancer distributes incoming traffic across multiple targets, such as Amazon EC2 instances. This increases the availability of your application. You add one or more listeners to your load balancer.
A listener checks for connection requests from clients, using the protocol and port that you configure, and forwards requests to a target group.
In addition, a target group routes requests to one or more registered targets, such as EC2 instances. Basically, using the protocol and the port number that you specify. Hence, Network Load Balancer target groups support the TCP, UDP, TCP_UDP, and TLS protocols. Additionally, you can register a target with multiple target groups. Furthermore, you can configure health checks on a per target group basis. Thus, health checks are performed on all targets registered to a target group that is specified in a listener rule for your load balancer.
2. The load balancer distributes incoming traffic across multiple targets
3. Network Load Balancer overview
Above all, a Network Load Balancer functions at the fourth layer of the Open Systems Interconnection (OSI) model. It can handle millions of requests per second. After all, once the load balancer receives a connection request, it selects a target from the target group for the default rule. Therefore, it attempts to open a TCP connection to the selected target on the port specified in the listener configuration.
Therefore, when you enable an Availability Zone for the load balancer, Elastic Load Balancing creates a load balancer node in the Availability Zone. By default, each load balancer node distributes traffic across the registered targets in its Availability Zone only. Thus, if you enable cross-zone load balancing, each load balancer node distributes traffic across the registered targets in all enabled Availability Zones.
4. Work Smarter and Faster
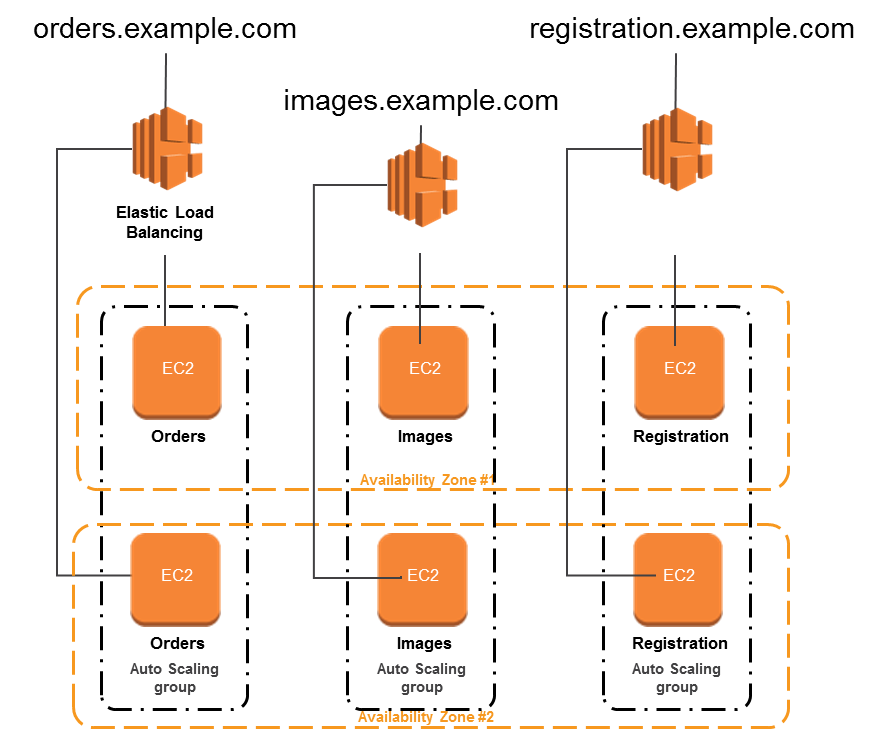
Thus, to increase the fault tolerance of your applications, you can enable multiple Availability Zones for your load balancer. This is to ensure that each target group has at least one target in each enabled Availability Zone. For example, if one or more target groups does not have a healthy target in an Availability Zone, we remove the IP address for the corresponding subnet from DNS. But the load balancer nodes in the other Availability Zones are still available to route traffic.
In addition, for TCP traffic, the load balancer selects a target using a flow hash algorithm. Basically, based on the protocol, source IP address, source port, destination IP address, destination port, and TCP sequence number. Therefore, the TCP connections from a client have different source ports and sequence numbers. Those can be routed to different targets. This, each individual TCP connection is routed to a single target for the life of the connection.
5. AWS NLB
Furthermore, for UDP traffic, the load balancer selects a target using a flow hash algorithm. It is based on the protocol, source IP address, source port, destination IP address, and destination port. Therefore, a UDP flow has the same source and destination. So it is consistently routed to a single target throughout its lifetime. Thus, different UDP flows have different source IP addresses and ports, so they can be routed to different targets.
Basically, AWS Elastic Load Balancing creates a network interface for each Availability Zone you enable. Above all, each load balancer node in the Availability Zone uses this network interface to get a static IP address. Thus, when you create an Internet-facing load balancer, you can optionally associate one Elastic IP address per subnet.
Basically, when you create a target group, you specify its target type, which determines how you register targets. For example, you can register instance IDs, IP addresses, or an Application Load Balancer. The target type also affects whether the client IP addresses are preserved.
You can add and remove targets from your load balancer as your needs change. All this without disrupting the overall flow of requests to your application. Thus, Elastic Load Balancing scales your load balancer as traffic to your application changes over time. Therefore, Elastic Load Balancing can scale to the vast majority of workloads automatically.
Benefits of migrating from a Classic Load Balancer
Using a Network Load Balancer instead of a Classic Load Balancer has the following benefits:
- First of all, the ability to handle volatile workloads and scale to millions of requests per second.
- Secondly, the support for static IP addresses for the load balancer. You can also assign one Elastic IP address per subnet enabled for the load balancer.
- Moreover, support for registering targets by IP address, including targets outside the VPC for the load balancer.
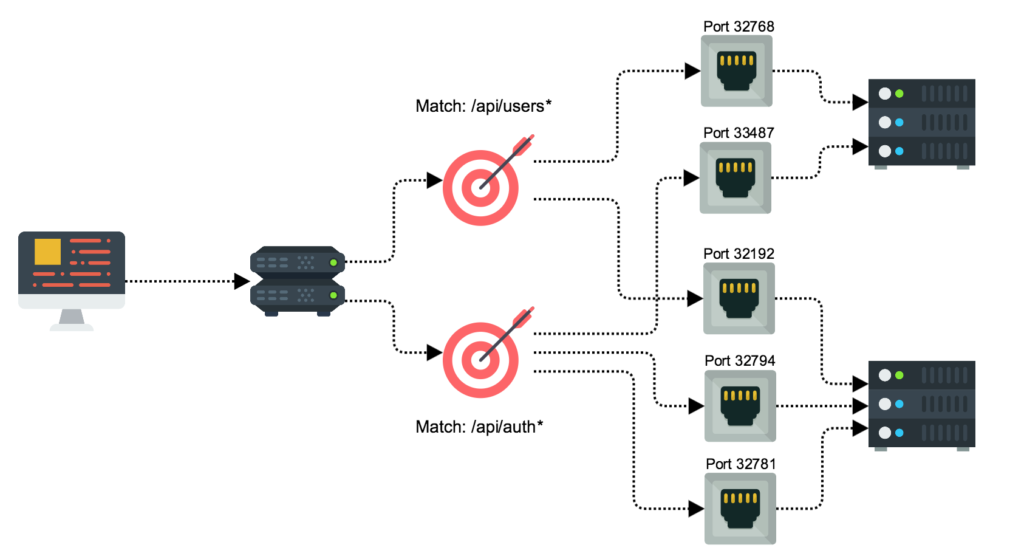
- In addition, there is support for routing requests to multiple applications on a single EC2 instance. You can register each instance or IP address with the same target group using multiple ports.
- Also, support for containerized applications. Amazon Elastic Container Service (Amazon ECS) can select an unused port when scheduling a task. It can also and register the task with a target group using this port. This enables you to make efficient use of your clusters.
- Furthermore, support for monitoring the health of each service independently, as health checks are defined at the target group level. Along with many Amazon CloudWatch metrics are reported at the target group level. Attaching a target group to an Auto Scaling group enables you to scale each service dynamically based on demand.
Tutorial: Create a Network Load Balancer using the AWS CLI
Additionally, in this exercise, you will obtain and log in to a Personal Developer Instance (PDI).
To create your first load balancer, complete the following steps.
To create a IPv4 load balancer
- Use the create-load-balancer command to create an IPv4 load balancer, specifying a public subnet for each Availability Zone in which you launched instances. You can specify only one subnet per Availability Zone.By default, when Network Load Balancers are created using the AWS CLI, they do not automatically use the default security group for the VPC. If you don’t associate any security groups with your load balancer during creation, you can’t add them later. We recommend that you specify security groups for your load balancer during creation by using the
--security-groupsoption.aws elbv2 create-load-balancer --name my-load-balancer --type network --subnets subnet-0e3f5cac72EXAMPLE --security-groups sg-0123456789EXAMPLEThe output includes the Amazon Resource Name (ARN) of the load balancer, with the following format:arn:aws:elasticloadbalancing:us-east-2:123456789012:loadbalancer/net/my-load-balancer/1234567890123456 - Use the create-target-group command to create an IPv4 target group, specifying the same VPC that you used for your EC2 instances. IPv4 target groups support IP and instance type targets.
aws elbv2 create-target-group --name my-targets --protocol TCP --port 80 --vpc-id vpc-0598c7d356EXAMPLEThe output includes the ARN of the target group, with this format:arn:aws:elasticloadbalancing:us-east-2:123456789012:targetgroup/my-targets/1234567890123456 - Use the register-targets command to register your instances with your target group:
aws elbv2 register-targets --target-group-arn targetgroup-arn --targets Id=i-1234567890abcdef0 Id=i-0abcdef1234567890 - Use the create-listener command to create a listener for your load balancer with a default rule that forwards requests to your target group:
aws elbv2 create-listener --load-balancer-arn loadbalancer-arn --protocol TCP --port 80 \ --default-actions Type=forward,TargetGroupArn=targetgroup-arnThe output contains the ARN of the listener, with the following format:arn:aws:elasticloadbalancing:us-east-2:123456789012:listener/net/my-load-balancer/1234567890123456/1234567890123456 - (Optional) You can verify the health of the registered targets for your target group using this describe-target-health command:
aws elbv2 describe-target-health --target-group-arn targetgroup-arn
Conclusion
Thus, To configure your load balancer, you create target groups, and then register targets with your target groups. Your load balancer is most effective if you ensure that each enabled Availability Zone has at least one registered target. You also create listeners to check for connection requests from clients and route requests from clients to the targets in your target groups.
Want to learn web development? The Web Developer Bootcamp course by ClayDesk can be a great asset for your learning journey.