
How To Use AWS Route 53
The overview and procedures below will help you get started with AWS.
Moreover, Create an administrative user first. Thus, after you sign up for an AWS account, create an administrative user so that you don’t use the root user for everyday tasks.
AWS Route 53 is a DNS (Domain Name System) service that allows you to manage and route traffic to your domain names.
https://www.claydesk.com
1. First of all, Sign in to the AWS Management Console as the account owner by choosing Root user and entering your AWS account email address. On the next page, enter your password.
How to Configure AWS Route 53 Step by Step
Sign in to the AWS Management Console as the account owner by choosing Root user and entering your AWS account email address. On the next page, enter your password. Above all, turn on multi-factor authentication (MFA) for your root user.
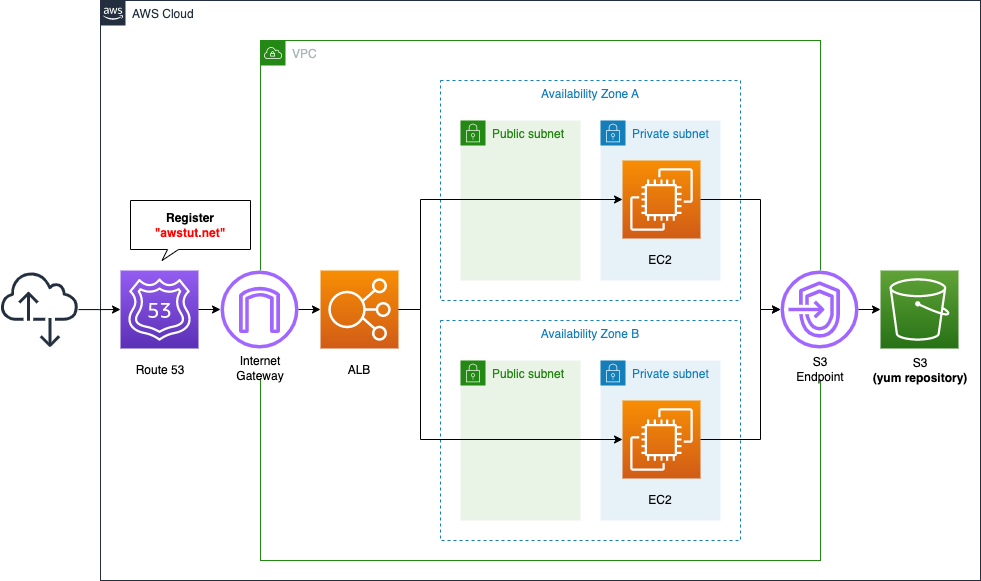
Furthermore, Use your domain for a static website in an Amazon S3 bucket. Register a domain name, such as claydesk.com
Create an Amazon S3 bucket and configure it to host a website. Thus, create a sample website and save the file in your S3 bucket. Configure Amazon Route 53 to route traffic to your new website.
AWS Route 53 is a DNS (Domain Name System) service that allows you to manage and route traffic to your domain names. Here are the basic steps for using AWS Route 53:
Important Steps To Follow
1. Sign in to the AWS Management Console and navigate to the Route 53 dashboard.
2. Therefore, create a Hosted Zone: A hosted zone is a container for the DNS records for your domain. You can create a new hosted zone by clicking on the “Create Hosted Zone” button and following the prompts.
3. After all, add DNS Records: Once you have created a hosted zone, you can add DNS records to it. DNS records tell Route 53 how to route traffic for your domain. There are several types of DNS records you can create, such as A records (which map a domain name to an IP address), CNAME records (which map a domain name to another domain name), and MX records (which specify the mail servers for a domain).
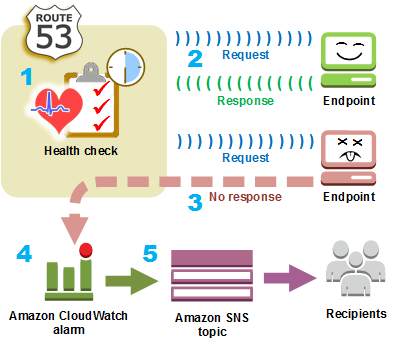
4. Additionally, route Traffic: Once you have created DNS records, you can use Route 53 to route traffic to your domain. You can create routing policies that determine how Route 53 routes traffic to your domain based on factors like the location of the user, the health of the endpoint, and more.
5. Thus, monitor and Manage: Finally, you can use Route 53 to monitor and manage your domain’s DNS configuration. You can view metrics and logs, set up alarms, and make changes to your DNS records as needed.
6. Cost-effective: AWS Audit Manager is a cost-effective solution for managing compliance and auditing activities. Furthermore, it eliminates the need for manual processes and reduces the risk of non-compliance.
Note
The AWS Management Console includes a console for Amazon Route 53, but if you want to access the services programmatically
https://www.claydesk.com
AWS Route 53 Security
For example, overall, AWS Route 53 provides a powerful set of tools for managing and routing traffic to your domain names. With the right configuration, you can ensure that your users are always able to access your services quickly and reliably.

Assessment filter
In addition, you can use the assessment filter to focus on a specific active assessment.
First of all, to apply the assessment filter, select an assessment from the drop-down list at the top of the dashboard. This list shows up to 10 of your active assessments. The most recently created assessments appear first. Above all, if you have many active assessments, you can start typing the name of an assessment to quickly find it. Hence, after you select an assessment, the dashboard displays data for that assessment only.

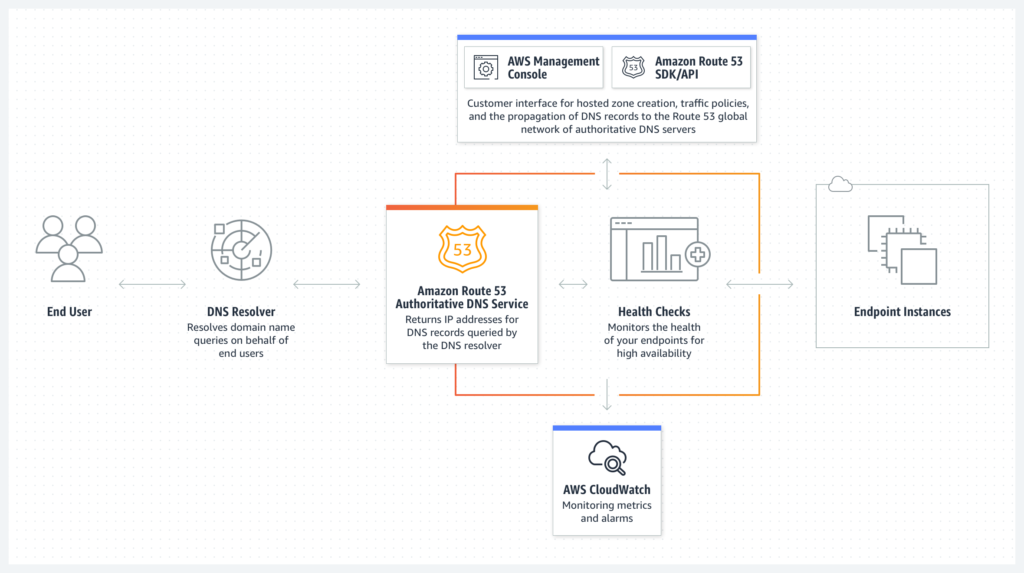
How internet traffic is routed to your website or web application
After you configure Amazon Route 53 to route your internet traffic to your resources, such as web servers or Amazon S3 buckets, here’s what happens in just a few milliseconds when someone requests content for www.example.com:
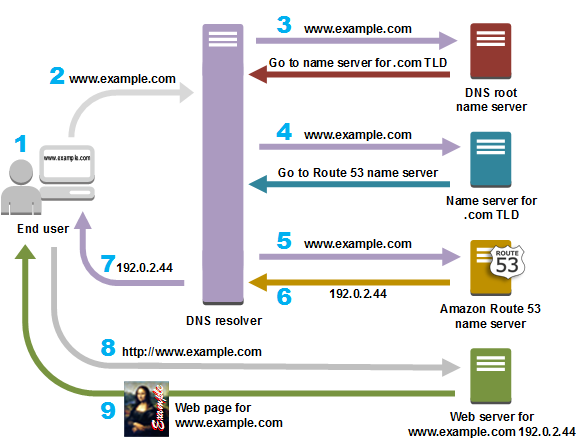
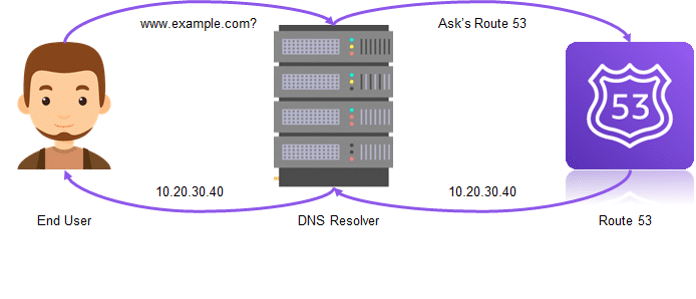
1. First of all, a user opens a web browser, enters www.example.com in the address bar, and presses Enter.
2. Secondly, the request for www.example.com is routed to a DNS resolver, which is typically managed by the user’s internet service provider (ISP), such as a cable internet provider, a DSL broadband provider, or a corporate network.
3. Therefore, the DNS resolver for the ISP forwards the request for www.example.com to a DNS root name server.
4. Hence, the DNS resolver forwards the request for www.example.com again, this time to one of the TLD name servers for .com domains. The name server for .com domains responds to the request with the names of the four Route 53 name servers that are associated with the example.com domain.
5. Basically, the DNS resolver caches (stores) the four Route 53 name servers. The next time someone browses to example.com, the resolver skips steps 3 and 4 because it already has the name servers for example.com. The name servers are typically cached for two days.
Important Steps
6. The DNS resolver chooses a Route 53 name server and forwards the request for www.example.com to that name server.
7. The Route 53 name server looks in the example.com hosted zone for the www.example.com record, gets the associated value, such as the IP address for a web server, 192.0.2.44, and returns the IP address to the DNS resolver.
The DNS resolver finally has the IP address that the user needs. The resolver returns that value to the web browser.
8. The web browser sends a request for www.example.com to the IP address that it got from the DNS resolver. This is where your content is, for example, a web server running on an Amazon EC2 instance or an Amazon S3 bucket that’s configured as a website endpoint.
9. The web server or other resource at 192.0.2.44 returns the web page for www.example.com to the web browser, and the web browser displays the page.
Controls with non-compliant evidence grouped by control domain
Choosing a routing policy
When you create a record, you choose a routing policy, which determines how Amazon Route 53 responds to queries:
1. Simple routing policy – Use for a single resource that performs a given function for your domain, for example, a web server that serves content for the example.com website. You can use simple routing to create records in a private hosted zone.
2. Failover routing policy – Use when you want to configure active-passive failover. You can use failover routing to create records in a private hosted zone.
3. Geolocation routing policy – Use when you want to route traffic based on the location of your users. You can use geolocation routing to create records in a private hosted zone.
4. Geoproximity routing policy – Use when you want to route traffic based on the location of your resources and, optionally, shift traffic from resources in one location to resources in another.
5. Latency routing policy – Use when you have resources in multiple AWS Regions and you want to route traffic to the region that provides the best latency. You can use latency routing to create records in a private hosted zone.
6. IP-based routing policy – Use when you want to route traffic based on the location of your users, and have the IP addresses that the traffic originates from.
7. Multivalue answer routing policy – Use when you want Route 53 to respond to DNS queries with up to eight healthy records selected at random. You can use multivalue answer routing to create records in a private hosted zone.
8. Weighted routing policy – Use to route traffic to multiple resources in proportions that you specify. You can use weighted routing to create records in a private hosted zone.
AWS Audit Manager Features
1. Simplified compliance: After all, AWS Audit Manager simplifies the process of achieving compliance by providing prebuilt frameworks and customizable policies that align with industry standards and regulations.
2.Increased efficiency: Above all, Audit Manager automates many of the tasks associated with auditing, reducing the time and effort required to prepare for audits.
3.Better collaboration: In addition, Audit Manager enables collaboration among audit teams, making it easier to share audit policies, evidence, and findings.
4.Real-time monitoring: Furthermore, AWS Audit Manager provides real-time monitoring of AWS resources, enabling organizations to quickly identify potential risks and compliance violations.
5.Cost-effective: Hence, AWS Audit Manager is a cost-effective solution for managing compliance and auditing activities. It eliminates the need for manual processes and reduces the risk of non-compliance.
In addition, AWS Audit Manager is a powerful tool for organizations looking to simplify the process of achieving compliance with industry standards and regulations. It provides a centralized platform for managing audit-related activities, including creating audit policies, collecting evidence, and generating reports. Therefore, with its prebuilt frameworks, customizable policies, and automated evidence collection. In addition, the AWS Audit Manager makes it easy to achieve compliance while reducing the time and effort required for audit preparation.